Posts

Using Environment Light in Blender Tutorial

Image
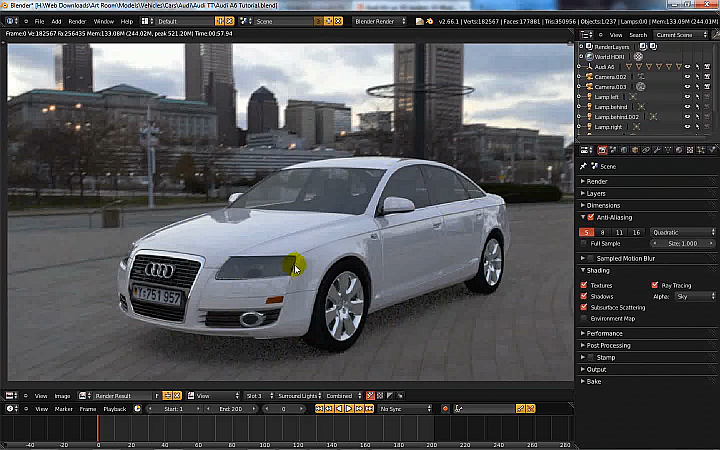
Blender HDRI Image Environment Lighting In this episode, we look at the Environment Lighting in Blender that creates an atmospheric illumination of all objects using an HDRI 360degree image. The color of the image is used as lighting to create realistically lit scenes - especially outdoor scenes. I discussed the following 1) assigning an HDRI image to the environment 2) settings to make renders fast 3) applying materials to a car 4) using different lighting settings

Blender - 3D Environment Lighting Tutorial

Image
Blender v3 HDRI Image Environment Lighting In this video, we look at the Environment Lighting in Blender that creates an atmospheric illumination of all objects using an HDRI 360degree image. The color of the image is used as lighting to create realistically lit scenes - especially outdoor scenes. I discussed the following 1) assigning an HDRI image to the environment  2) using Blender's built-in HDRI images for previewing lighting conditions 3) using Blender's built-in HDRI images in renders 4) using different environment lighting settings

Blender - Camera Culling (Masking) with Dynamic Paint

Image
Here is a method using the "Dynamic Paint" & "Mask" modifiers to have only the parts of an object that are in the camera view subsurfed and displaced.

Blender - Shadows Only Material Tutorial

Image
Various ways of rendering only the shadow (and indirect lighting) on a surface. Very useful for floors in external scenes.

Blender - Displacement and Adaptive Tesselation

Image
Using Blender's adaptive tessellation (subsurf) modifier to apply realtime displacement in the object's material output instead of using the "Displacement" modifier.

Blender - Environment Lighting with Background Images

Image
This video shows how to have a HDR image illuminate a scene while having another Backplate image for the background in both the Blender and Cycles rendering environments.

Blender - Transferred an Ocean Modified plane to a Solid Body plane

Image
1. Modify a plane with the Ocean Modifier. 2. Bake the displacement onto another plane saving the image sequence. 3. Use a displacement modifier with this second plane using the baked images. 4. Make this plane a Rigid Body "passive" 5. Add a sphere just above it as a Rigid Body "active" 6. Add the Beach Ball sphere and constrain it's position just below the Rigid Body sphere. 7. Run the animation and the Rigid Body sphere (hidden) moves around the Rigid Body plane along with the Beach Ball. 8. Render out the plane and Beach Ball animation. I am intending to do a tutorial on this for those who require one.

Blender - Testing the Dynamic Paint Physics

Image
This is my first quick test of the DynamicPaint "waves" physics option using the canvas and brush with a direct vertex distortion instead of the multi-image baking. A plane using "canvas" covers the swimming pool. A plane using "brush" is a typical particle emitter directly above the swimming pool plane (out of shot above) The "line" render option in the particle system is used with a very transparent material. It looks more realistic than using an "object" render as most rain really does look like lines. I intend to do a tutorial on this for those who desire one.